Write Your First Microservice in JavaScript
This article covers the practical aspect of developing a simple API based microservice using JavaScript, NodeJS and containerizing using docker.

Before developing the microservice, let us know about the basic theoretical understanding of microservices.
What are Microservices?

One of the simple and my favorite definition is
“Microservices are an architectural and organizational approach to software development where software is composed of small independent services that communicate over well-defined APIs. These services are owned by small, self-contained teams.”
Microservices architectures make applications easier to scale and faster to develop, enabling innovation and accelerating time-to-market for new features. Microservices are small, independent, and loosely coupled.
You can learn more at : https://microservices.io/
Definition referenced from : https://aws.amazon.com/microservices/
Developing a microservice
I will be using windows machine for the whole demonstration
Pre-requisites
Basic understanding of Nodejs , routes ,ExpressJs , HTTP requests
Installations
Verifying installation for Docker and NodeJS
Go to your command prompt (cmd )in windows and enter the following commands:
node -v
docker -v

If you get the versions as output then your installation is successful
Folder structure for the project

Its a good practice to create services folders. In the future its easy to add a new microservice by simply adding a file in database folder as well as service folder. Imagine there is no folder and your code base has grown a lot, it becomes a tiresome work to change the imports and bring everything to folders, so its advised to create a folder for databases and services.
Enough speaking, lets start the development 🎉👨💻
Step 1: Creating a package.json file , open the folder where you want to setup the project and if you are using VS Code open integrated terminal (ctrl+`).Now enter the following command
npm init or use npm init -y to skip the interactive process.
Step 2: Installing express using npm
npm install expressStep 3: Creating 2 folders namely databases and services
Step 4: In the databases folder create a file fruits.json, here we will store the information of fruits. you can create a dummy array or use the below displayed data.
Step 5: In the services folder create a file fruits.js or you can name it as you wish and copy the following content. Here we are creating a basic routes that display information about fruits which are imported from file database.
Note: If you observe clearly we are not listening to the app in this file, instead we are exporting it, the reason is if you are performing tests you actually need to import it because the testing libraries perform tests on various routes so when you run a test it starts to listen on the route rather than performing tests if we listen to app in the same file ,which leads to infinite waiting. Also its a best practice which will make code look cleaner and understandable.
Step 6: Creating app.js in the root directory , here we import the service and listen through the PORT 3000 for requests.
const {app}=require('./services/fruits')
app.listen(3000,()=>{
    console.log("Server is running on PORT 3000")
})
Step 7: Navigate to your project folder in cmd or if you are using VS Code click ctrl+` and enter
node app.jsStep 8: Navigate to localhost:3000 in your browser and you are done, congrats 🎉 we are half way to the destination.

In this article we just covered a single microservice, but in reality there are 100s of microservices communicating inside a single application
Now we need to containerize our app.
Containerizing the application
Pre-requisites
Basic understanding of Image, Container and also some docker commands.
Let us clear the basics before moving to next part. I assume you know what is docker, so lets talk about Images and Containers.
“Images are basically the code base for containers they contain data like actual code, libraries, dependencies, commands to make an application run. Its like a read-only template that contains a set of instructions for creating a container that can run on the Docker platform.”
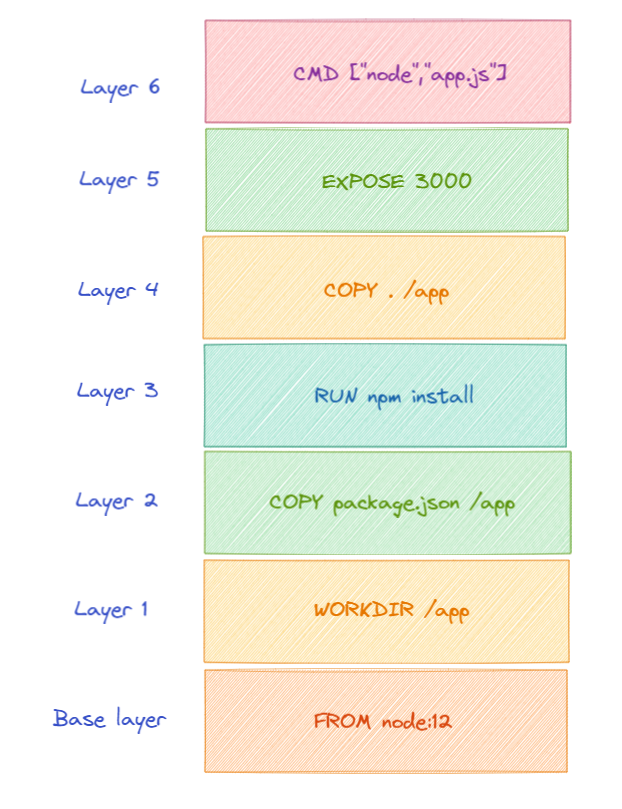
Docker uses the concept of layers, that is every image can be inherited from base image and each layer is dependent on the layer immediately below it.
“Containers are actual run time environment for the applications. They are the ready applications created from Docker Images. Or you can say they are running instances of the Images.”
The first step to containerize is to build a image and we can build image by creating a Dockerfile. There are 2 ways to build a image
- Creating image from container
- Creating image from Dockerfile.
We will choose the second one its the simplest to start with.
What is a Dockerfile?
A Dockerfile is a simple text document that contains all the commands a user could call on the command line to assemble an image. Dockerfile is used to automate the process of creating images.
Now create a file with name Dockerfile with (no extensions like .txt ) in root directory of your project and copy the following code.
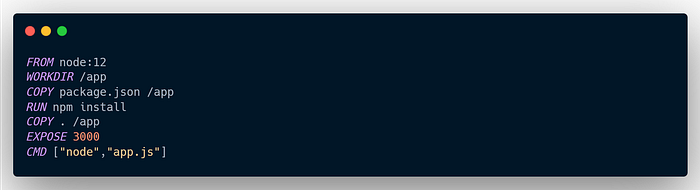
Understanding the Dockerfile
FROM node:12Docker images can be inherited from other images. This acts as base image , So instead of creating our own base image, we’ll use the official Node.js image.
WORKDIR /appThis command instructs Docker to use this path as the default location for all subsequent commands.
COPY package.json /appThe COPY command is used to get the package.json into our image working directory (/app). The COPY command has 2 parameters ,the first parameter tells Docker what file you would like to copy into the image while the second parameter tells Docker where you want that file to be copied to. After this command the package.json file is copied into our working directory — /app.
RUN npm installOnce the package.json file is inside the image, the RUN command can be used to execute the command npm install. This works exactly the same as running npm install locally on our machine but these node modules will be installed into the node_modules directory inside our image.
COPY . /appThis COPY command will take all the files located in the current directory and copies them into app directory in the image.
EXPOSE 3000The EXPOSE instruction informs Docker that the container listens on the specified network ports at runtime. Use the same port number that you have used in your app.js file.
CMD [“node”,”app.js”]This CMD command tells Docker what command we want to run when our image is run inside of a container. Since our app.js starts the server we want to execute it first.
2 more steps to go !!!
As we discussed we can create image from docker file, our file is ready now
Building a image
To build a image , just use the below command in your root directory
docker image build -t fruits-service:latest .-t flag gives name as fruits-service with tags latest.
The “.” at the end of the docker build command tells that Docker should look for the Dockerfile in the current directory. A new image will be generated from the Dockerfile after running the above command

As you can see a new image is built with name fruits-service and tag latest
Running the container
Instead of creating and starting a container we can directly run the container
docker run = docker create + docker start + docker attach
Note: docker attach attaches the terminal to container to make it interactive. As we already discussed container just acts like a run time environment it has all elements of a real application environment.
To run a container use the below command
docker container run -d --name fruitsmicroservice --publish 3000:3000 fruits-service:latest
-d tell the container to run in detached mode, here we aren't performing any commands on terminal so we just detach it.--name gives the name fruitsmicroservice to container instead of random string--publish exposes the port of created application , here we mentioned 3000 in Dockefile so we need to expose it.Here we need to understand concept of port mapping in docker, the first 3000 in --publish 3000:3000 indicates host port and second 3000 indicate container port. Here we keep both same, if already you have something running on host port 3000 you can use 3001:3000 to map.
You can verify container status using the command
docker ps
Now go to localhost:3000 in your browser and boom ✨, we got our application running. You can now try all the routes.
Dont forget to stop the container, after your work. Use docker ps and you will get your container ID, execute the following command to stop the contianer.
docker container stop <container-id>So in this article we have covered all the steps to create a microservice in JavaScript and containerize using docker.
The above code can be found at https://github.com/Deepakmukka1/microservice-fruits
Thank you for reaching the end of article 🙌, Hope you liked it.

if(you.lovedTheArticle())
{
clap();
}